4.1. Preparation#
4.1.1. Prerequisites#
Prepare the following hardware.
1 x GMSL2-10GbE conversion module
1 x Heat Sink (Avant AES-ACC-KRIA-HSINK)
1 x Fan
Same Sky P/N: CFM-5010-03-22-ND
Molex P/N: 0470541000
Molex P/N: 0008550102 (Qty: 4)
Warning
You need to assemble the Fan. You also need crimper for assembly. For details, please see here.
1 x Micro SD Card (> 16GB)
TIER IV Automotive HDR Camera C1 or C2
Up to 8 C1 cameras can be connected
Up to 4 C2 cameras can be connected
1 x Computer with 10Gb ethernet interface
Linux (Ubuntu)
Internet connection required
1 x SFP+ Ethernet cable or SFP to RJ-45 converter
SFP to RJ-45 converter: SFP-10G-T-S or SFP-10G-T-X
AC Adapter
Supply voltage: 10V < V < 48V
DC Jack: 5.5x2.5mm
Caution
Make sure the Host computer you use has 10Gb ethernet card/port. Otherwise, consider using an adapter, such as a Thunderbolt-10Gb Ethernet adapter.
This system may work with the other host operating system, such as Windows environment, but not supported by TIER IV yet.
4.1.2. Preparing the SD card image (with Linux environment)#
Firstly, you need to download the image file.
To download the v9 image, please follow the below instruction.
Download the image by using
wget https://swdownloads.analog.com/cse/gmsl/10G/v2_24/gmsl-10g-v9_1.tar.xz.gpg
Decrypt the gpg file by using
gpgcommand.
gpg --output gmsl-10g-v9_1.tar.xz --decrypt gmsl-10g-v9_1.tar.xz.gpg
The system will ask the passphrase. Please contact to TIER IV for the passphrase.
after decrypting the gpg file, please proceed to the next step.
Extract the image file
tar Jxvf ./gmsl-10g-v9_1.tar.xz
Connect the SD card to the computer. Then identify the SD card using lsblk command. The result will look like the below.
NAME         MAJ:MIN RM   SIZE RO TYPE MOUNTPOINT
loop0          7:0    0    16M  1 loop
sda            8:0    1  57.7G  0 disk
├─sda1         8:1    1   256M  0 part /media/ubuntu/bootfs
└─sda2         8:2    1   4.9G  0 part /media/ubuntu/rootfs
mmcblk0      179:0    0  59.3G  0 disk
├─mmcblk0p1  179:1    0  57.8G  0 part /
├─mmcblk0p2  179:2    0   128M  0 part
├─mmcblk0p3  179:3    0   768K  0 part
├─mmcblk0p4  179:4    0  31.6M  0 part
├─mmcblk0p5  179:5    0   128M  0 part
├─mmcblk0p6  179:6    0   768K  0 part
├─mmcblk0p7  179:7    0  31.6M  0 part
├─mmcblk0p8  179:8    0    80M  0 part
├─mmcblk0p9  179:9    0   512K  0 part
├─mmcblk0p10 179:10   0    64M  0 part
├─mmcblk0p11 179:11   0    80M  0 part
├─mmcblk0p12 179:12   0   512K  0 part
├─mmcblk0p13 179:13   0    64M  0 part
└─mmcblk0p14 179:14   0 879.5M  0 part
zram0        251:0    0   2.6G  0 disk [SWAP]
zram1        251:1    0   2.6G  0 disk [SWAP]
zram2        251:2    0   2.6G  0 disk [SWAP]
zram3        251:3    0   2.6G  0 disk [SWAP]
zram4        251:4    0   2.6G  0 disk [SWAP]
zram5        251:5    0   2.6G  0 disk [SWAP]
zram6        251:6    0   2.6G  0 disk [SWAP]
zram7        251:7    0   2.6G  0 disk [SWAP]
zram8        251:8    0   2.6G  0 disk [SWAP]
zram9        251:9    0   2.6G  0 disk [SWAP]
zram10       251:10   0   2.6G  0 disk [SWAP]
zram11       251:11   0   2.6G  0 disk [SWAP]
In this case, the SD card is /dev/sda.
Then burn the image file to the SD card (Please change the name-of-the-image.img and /dev/xxx upon your environment). This process may take several minutes.
sudo dd if=name-of-the-image.img of=/dev/xxx bs=4M status=progress
sync
After burning the image file, please proceed to the next step.
4.1.3. Preparing the SD card image (with Windows environment)#
4.1.3.1. Download the image and extract it#
Download the image from the URI as described in the Linux section
decrypt the file by using
gpg. Please contact to TIER IV for the passphrase.Extract the image, for instance, by using Zip Extractor
4.1.3.2. Burning the image#
You can use various software, such as Etcher or Raspberry pi Imager to burn the image file to the SD card. Please download & install your preferred SW.
In this document, we take Raspberry pi Imager as a example.
Open Raspberry pi Imager
Select
CHOOSE OS->Use custom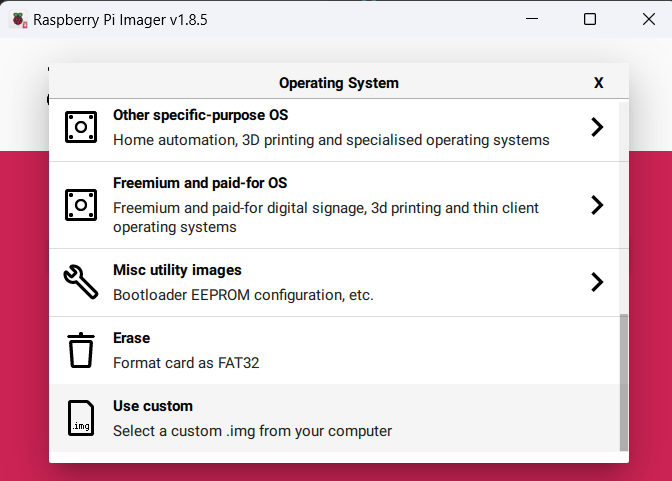
Select Extracted image file (
***.img).Select Target SD card by selecting
CHOOSE STORAGE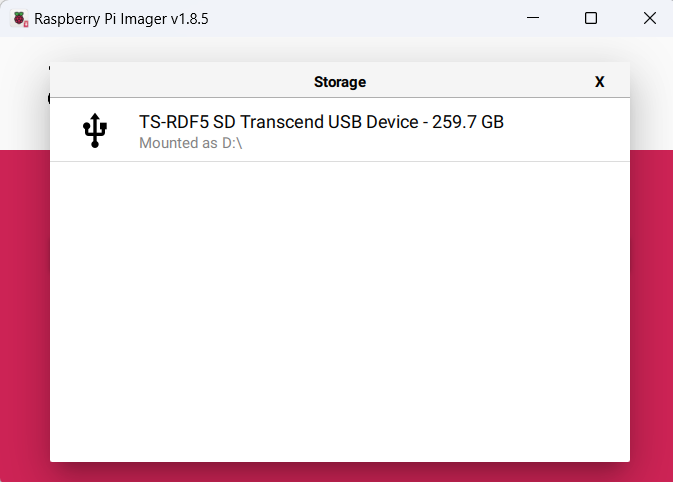
Click
NEXTthen start the burning.
4.1.4. Hardware connection and setup#
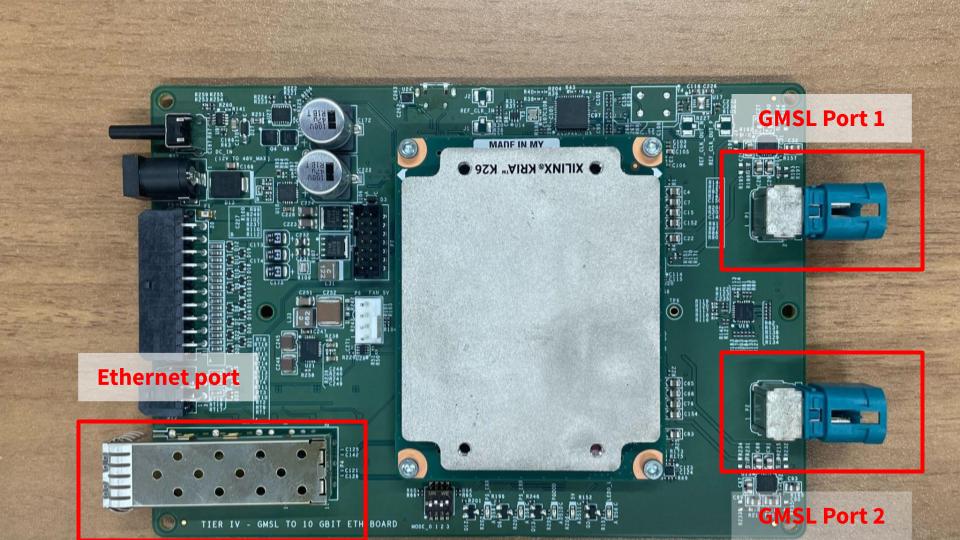
Fig. 4.1 Front side of the board#

Fig. 4.2 Back side of the board#
Connect the Fakra cable to the GMSL port. You need to use mini-Fakra jack cable.
Attention
There are some points to note about connecting the camera. Please check this page for details.
Connect the Cameras to the Fakra cable.
Connect the ethernet cable to the ethernet port.
Caution
You need to use SFP+ ethernet cable or SFP to RJ45 converter.
(Optional) Connect mini-USB cable to the serial port.
Insert the SD card into the SD card slot.
Power on the board by inserting the power plug.
4.1.5. Next Step#
Linux host machine user: Getting started with Linux