4.2. Getting started with Linux#
4.2.1. Connect the Ethernet cable to the host computer’s 10G Ethernet port#
Please make sure you connect the ethernet cable to the port that has 10Gb compatibility. In this manual, we use eth1 port.
4.2.2. Configure the network#
4.2.2.1. Check the link status#
use ethtool command to check the link status.
ethtool eth1
The output should look like the following.
ubuntu@EAC-5000:~$ ethtool eth1
Settings for eth1:
        Supported ports: [ TP ]
        Supported link modes:   100baseT/Full
                                1000baseT/Full
                                10000baseT/Full
                                2500baseT/Full
                                5000baseT/Full
        Supported pause frame use: Symmetric Receive-only
        Supports auto-negotiation: Yes
        Supported FEC modes: Not reported
        Advertised link modes:  100baseT/Full
                                1000baseT/Full
                                10000baseT/Full
                                2500baseT/Full
                                5000baseT/Full
        Advertised pause frame use: No
        Advertised auto-negotiation: Yes
        Advertised FEC modes: Not reported
        Speed: 10000Mb/s
        Duplex: Full
        Port: Twisted Pair
        PHYAD: 0
        Transceiver: internal
        Auto-negotiation: on
        MDI-X: Unknown
Cannot get wake-on-lan settings: Operation not permitted
        Current message level: 0x00000005 (5)
                               drv link
        Link detected: yes
Make sure that Speed: 10000Mb/s is displayed.
4.2.2.2. Set MTU 9000#
Set the MTU to 9000 to achieve the intended network bandwidth. To do that, please use the following commands.
sudo ifconfig eth1 down
sudo ifconfig eth1 mtu 9000
sudo ifconfig eth1 up
After that, please confirm the mtu setting.
ifconfig
The output should look like the following.
ubuntu@EAC-5000:~$ ifconfig
...
eth1: flags=4163<UP,BROADCAST,RUNNING,MULTICAST>  mtu 9000
        inet 10.42.0.1  netmask 255.255.255.0  broadcast 10.42.0.255
...
The setting is successful if mtu 9000 is displayed.
4.2.2.3. Setting IP address to the board#
You can set the IP address on the board in three ways.
Caution
Please set only one of the following three. Setting multiple settings may not work properly.
Attention
To set the IP address manually or via a systemd network file, you first need to log in to the board via the serial console.
Attention
If you set the IP address using Manually or Systemd network file, please correct the IP address of the image output destination and the IP address of the image output source using the GUI or REST API.
Setting it via a network file enables persistence across reboots.
4.2.2.3.1. Setting IP address via DHCP#
To assign the IP address for the ethernet port of the GMSL board, we configure network settings by using GUI.
Open network settings (Settings -> Network).
Select the Ethernet adopter that has 10Gb speed (
Aquantia Ethernetis the one in this example)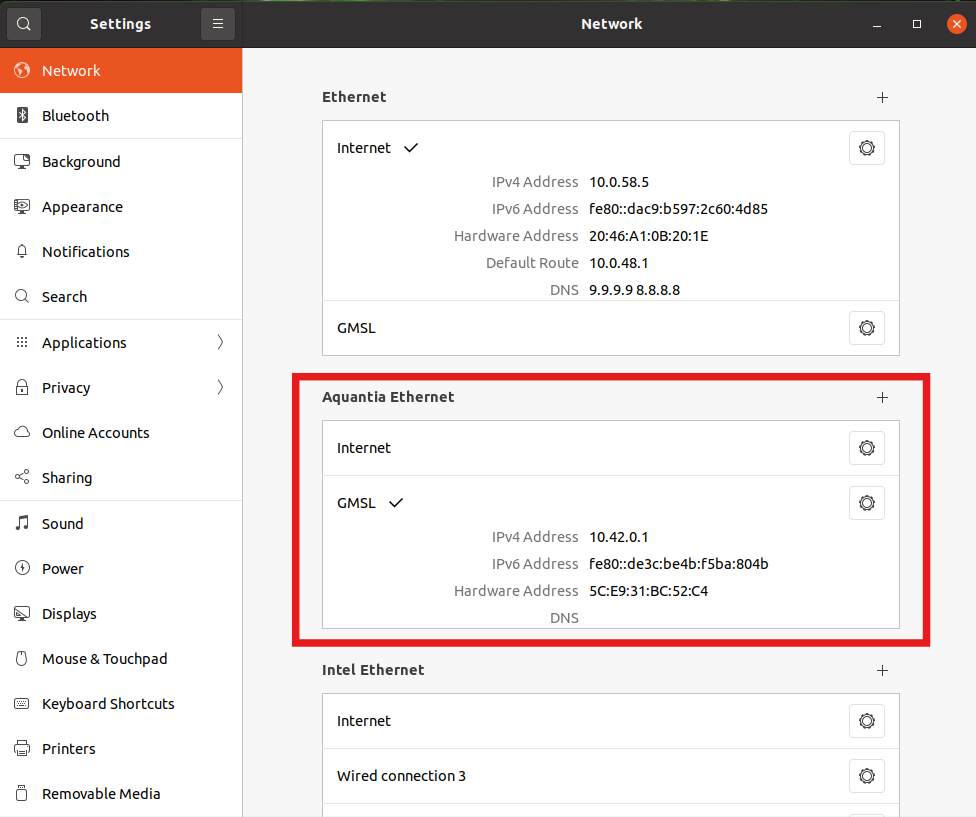
Fig. 4.3 Network setting window#
Go to the detailed setting (Gear icon), select IPv4, and select “Shared to other computers”.
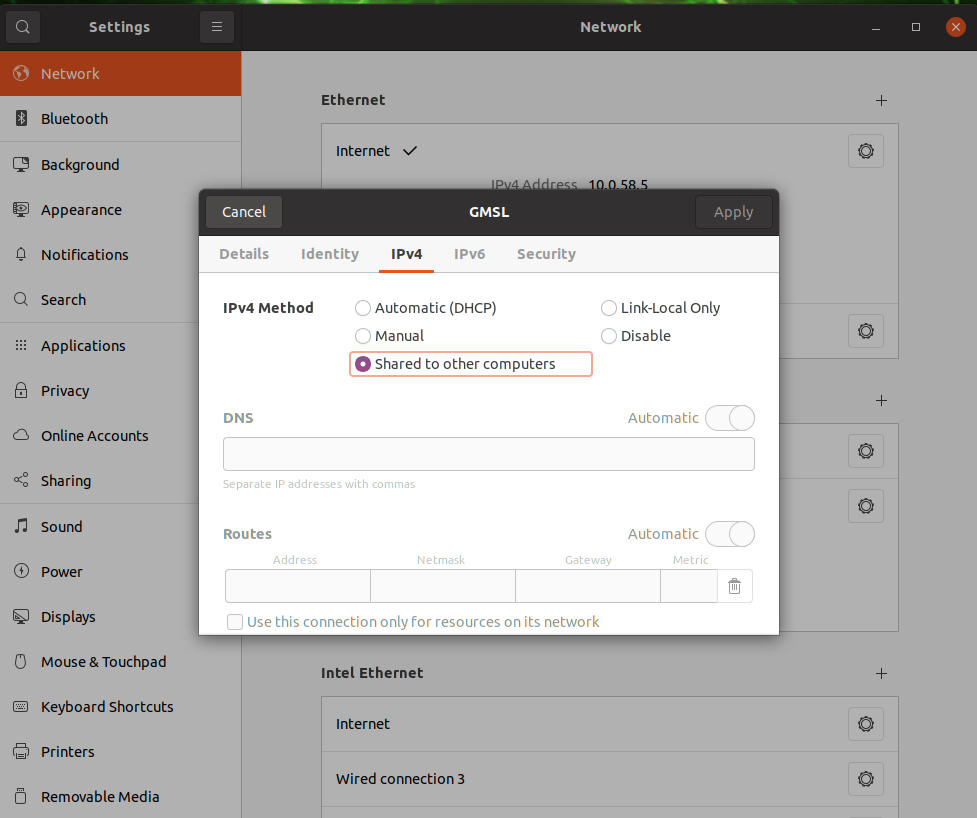
Fig. 4.4 Front Network sharing setting#
With the default,
10.42.0.1will be set to this interface.
4.2.2.3.2. Setting IP address Manually#
Use ifconfig to set eth0 to 10.42.0.3
sudo ifconfig eth0 10.42.0.3
After this, please confirm the IP address assigned. The result should be like below.
analog@kria-gmsl :~ $ ip a
1: lo: <LOOPBACK, UP, LOWER_UP> mtu 65536 qdisc noqueue state UNKNOWN group
default qlen 1000
link/loopback 00:00:00:00:00:00 brd 00:00:00:00:00:00
inet 127.0.0.1/8 scope host lo
valid_lft forever preferred_lft forever
inet6 :: 1/128 scope host
valid_lft forever preferred_lft forever
2: sit0@NONE: <NOARP> mtu 1480 qdisc noop state DOWN group default qlen 1000
link/sit 0.0.0.0 brd 0.0.0.0
3: eth0: <BROADCAST, MULTICAST, UP, LOWER_UP> mtu 9000 qdisc mq state UP group
default qlen 1000
link/ether a2:c2:aa:da:45:73 brd ff : ff: ff:ff:ff:ff
inet 10.42.0.3/8 brd 10.255.255.255 scope global eth0
valid_lft forever preferred_lft forever
inet6 fe80 :: a0c2:aaff:feda:4573/64 scope link
valid_lft forever preferred_1ft forever
You can confirm that IP address is assigned as intended by checking inet 10.42.0.3.
4.2.2.3.3. Setting IP address via systemd network file#
Write the following file to /etc/systemd/network/10-static.network
[Match]
Name=eth0

[Network]
DHCP=no
Address=10.42.0.3

[Link]
MTUBytes=9000
This also fixes the eth0 IP address to 10.42.0.3.
4.2.3. Login to GMSL2-10GbE board module#
To configure the GMSL board via CUI, you need to log in to the board. To do that, three methods are available.
Via SSH
Via serial Console
Via REST API
4.2.3.1. Login via SSH#
Two IP addresses are assigned to the GMSL board’s ethernet port.
IP address for image data output (fixed as
10.42.0.2by default)IP address for login (assigned randomly by default)
Here, we will log in to the GMSL board by using the IP address for login.
In the case you assign the IP address via DHCP, the IP address will be assigned randomly. We will scan the available IP address by using
arpcommand.arp
will return a similar result as the following.
ubuntu@EAC-5000:~$ arp
Address                  HWtype  HWaddress           Flags Mask            Iface
10.42.0.63               ether   66:4d:9a:96:5a:68   C                     eth1
10.42.0.63is the IP address assigned this time.Log in to the GMSL board by using
SSHto configure image output settings, using the following user name and password.Username: analog
Password: analog
ssh analog@<assigned ip address>
If successful, the output will be similar to the following:
ubuntu@EAC-5000:~$ ssh analog@10.42.0.63
analog@10.42.0.63\'s password:(Put <analog> here)
Welcome to Ubuntu 22.04.3 LTS (GNU/Linux 6.1.5-g19e31fe4c1ae-dirty aarch64)

* Documentation:  https://help.ubuntu.com
* Management:     https://landscape.canonical.com
* Support:        https://ubuntu.com/advantage

This system has been minimized by removing packages and content that are
not required on a system that users do not log into.

...
See also
You can log-in to the board by using the hostname based on the mDNS.
To do so, please login with the kria-gmsl.local. For instance, the command below should works.
ssh analog@kria-gmsl.local
4.2.3.2. Login via serial console#
In case you need to log in via the serial console, please follow this procedure:
Connect the USB cable that is connected to the serial console to the HOST PC.
Confirm if the serial port is recognized by PC.
ls -al /dev/ttyUSB*should return ttyUSB device.ubuntu@EAC-5000:~$ ls -al /dev/ttyUSB* crw-rw---- 1 root dialout 188, 0 Aug 8 04:07 /dev/ttyUSB0
add read/write permission by using
sudo chmod 666 /dev/ttyUSB0.There are some options to use the serial console. In this document, we use
gtktermfor it. To installgtkterm, please follow the following.sudo apt update sudo apt install gtkterm
Open the
gtkterm(by typinggtktermin the terminal). Then selectconfiguration. Select/dev/ttyUSB0in thePortsetting. Also, make sure theBaud Rateis set to115200.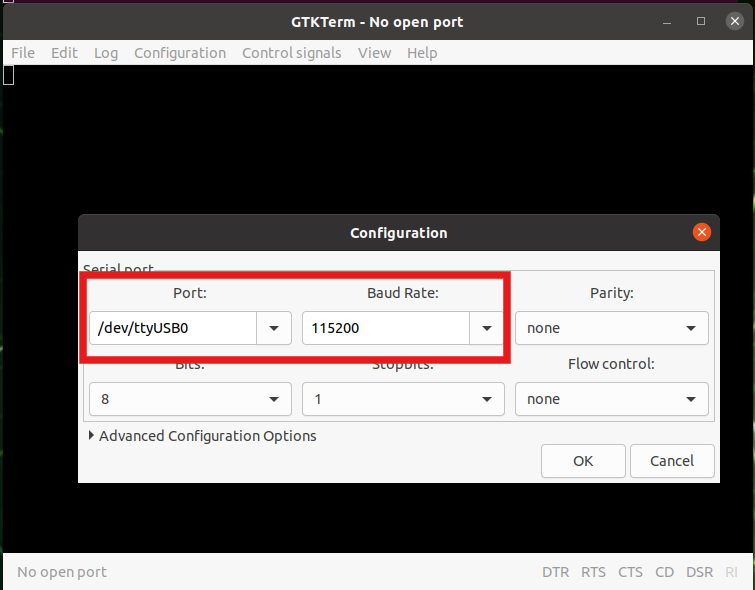
Fig. 4.5 Front Serial console setting (in the case of gtkterm)#
Click OK.
A login message should appear (if not, press ENTER).
Enter
analogas a login user and enteranalogas a password.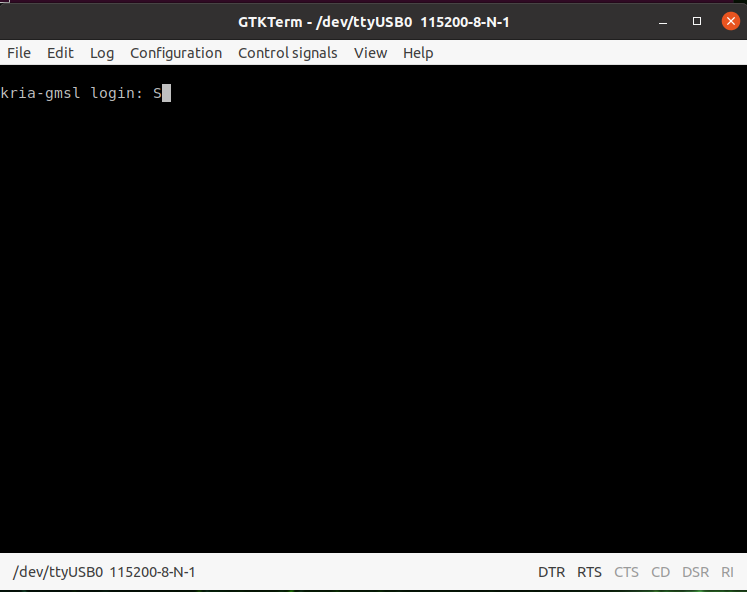
Fig. 4.6 Output in case of successful connection#
4.2.4. Next Step#
Please proceed one of the following: