3. TIER IV Cameras Getting Started Guide for Nvidia Jetson AGX Orin/Xavier Developer Kit#
Attention
This document is for the users of NVIDIA Jetson devkit Xavier/Orin
3.1. List of Required Equipment#
Nvidia Jetson AGX Orin Developer Kit or Nvidia Jetson AGX Xavier Developer Kit x 1
Deserializer kit
LI-JXAV-MIPI-ADPT-4CAM x 1
LI-GMSL2-IPX-DESER x 1~4 (1 per 2cameras)
FAW-1233-03 x 1~4 (1 per 2cameras)
GMSL2 Cable(FAKRA C-FAKRA C) x 1~8 (1 per 1 cameras)
TIER IV AUTOMOTIVE HDR CAMERA C1 x 1~6 or C2
3.2. Hardware connection#
Make sure the power of the Jetson AGX Orin Developer Kit (hereinafter referred to as Devkit) is turned off. After confirming, attach the Deserializer Kit and cameras as shown below. Refer to the following steps and connect each component accordingly.
C1 Camera <== GMSL2 cable(FAKRA Connector) ==> LI-GMSL2-IPX-DESER <== FAW-1233-03 ==> MIPI-ADPT-4CAM <=> Jetson
AGX Orin Developer Kit
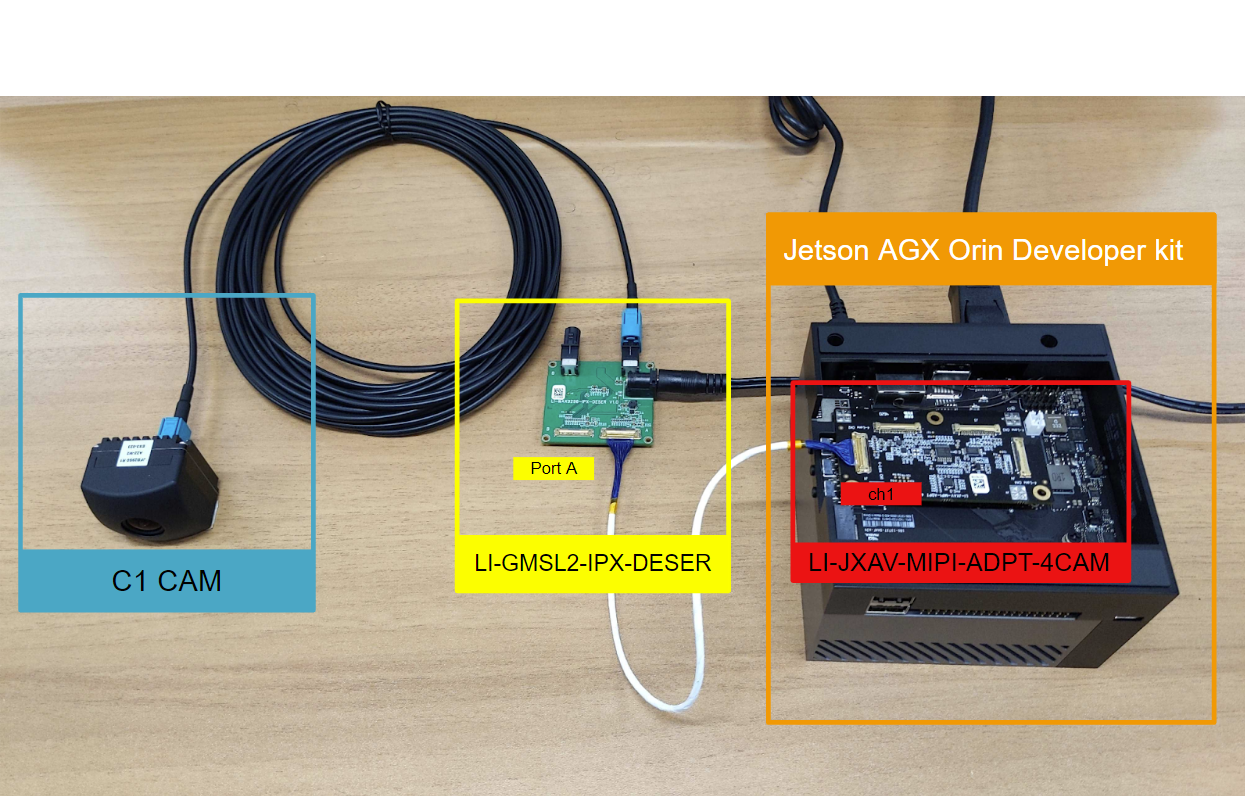
Fig. 3.1 Connection Examples for Each Component (Orin Devkit, 1 Camera)#
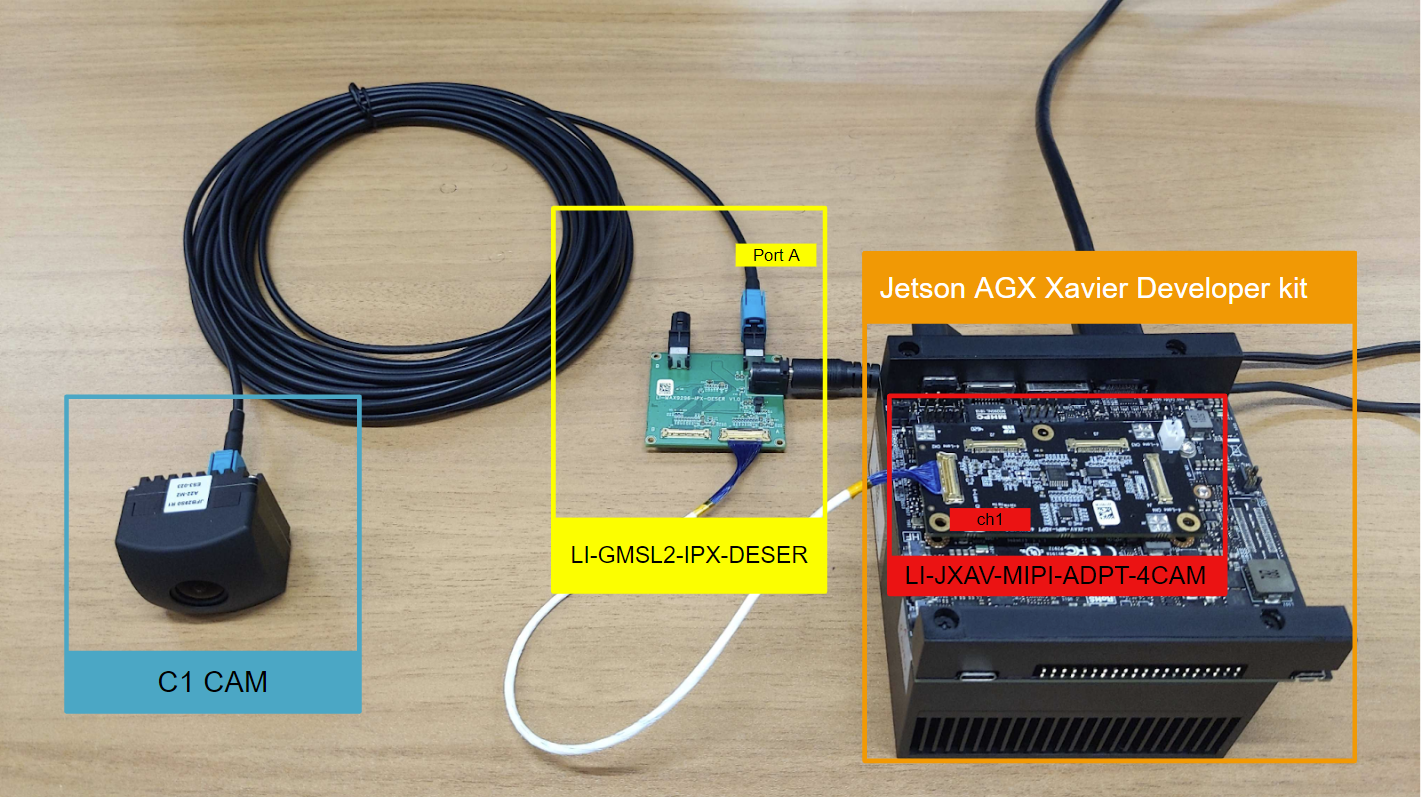
Fig. 3.2 Connection Examples for Each Component (Xavier Devkit, 1 Camera)#
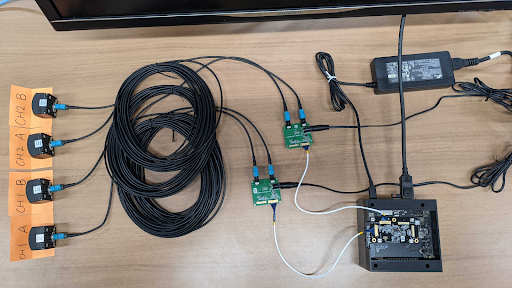
Fig. 3.3 Example of the cable connection (4 cameras)#
3.2.1. Connection of Deserializer Kit and Camera#
Connect the LI-JXAV-MIPI-ADPT-4CAM to the connector on the rear side of the Devkit.
Note
The LI-JXAV-MIPI-ADPT-4CAM is designed for the Jetson AGX Xavier Developer Kit, so there may be slight interference with the enclosure when connecting it to the Jetson AGX Orin Developer Kit. Please use it with caution, or consider using the adapter mentioned in the link to prevent any issues
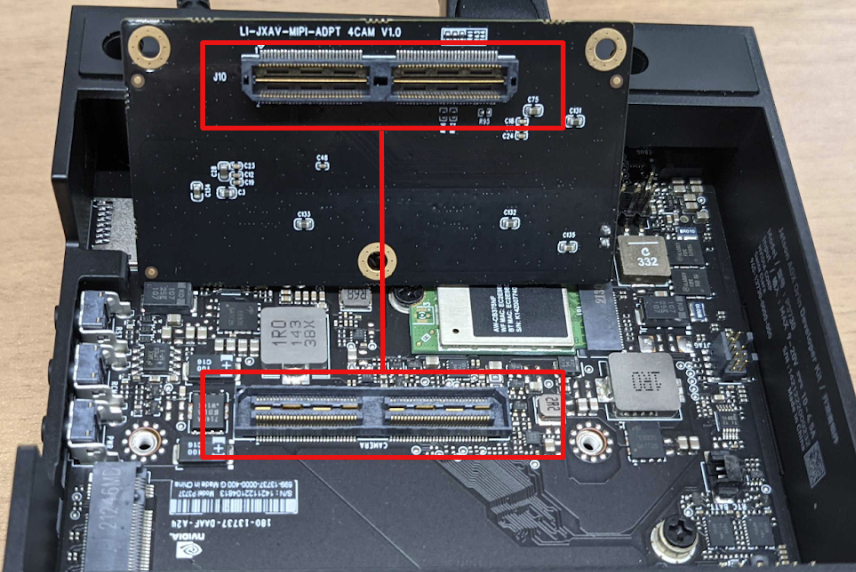
Fig. 3.4 LI-JXAV-MIPI-ADPT-4CAM connector#
Next, insert the FAW-1233-03 cable into CH1 of the LI-MAX9296-IPX-DESER.
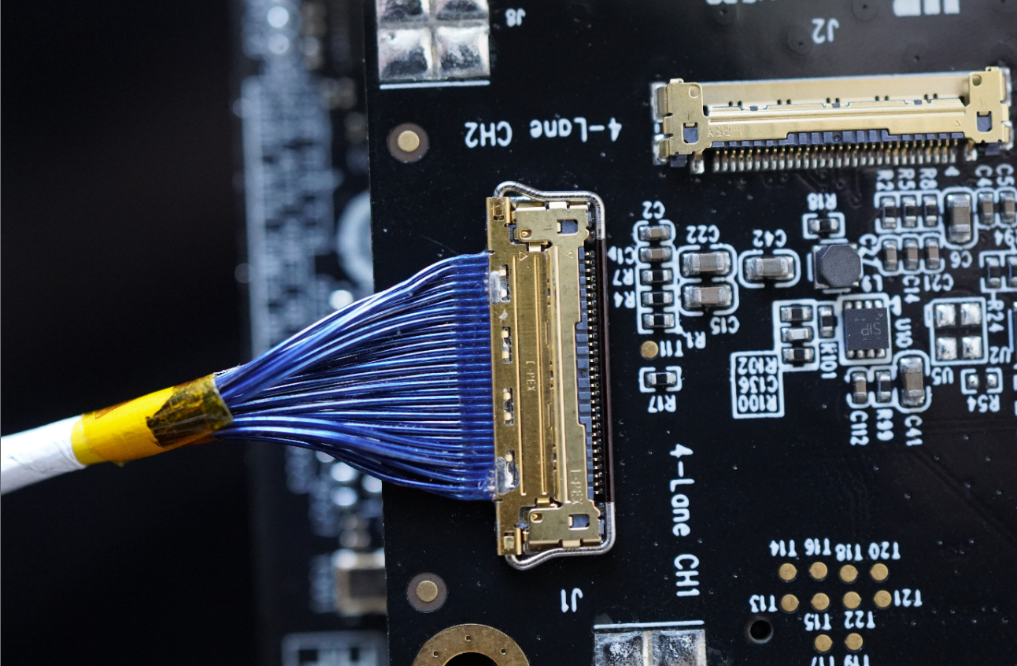
Fig. 3.5 Example of FAW-1233-03 Cable Connection#
Insert the other end of the previously connected cable into Port A of the LI-MAX9296-IPX-DESER. For single-camera evaluation, insert the FAKRA connector of the GMSL2 cable into Port A of the LI-MAX9296-IPX-DESER. For connecting two cameras, connect the FAKRA connector to Port A and Port B.
Attention
Please be noticed that you need to supply 12V for deserializer from external AC adapter, separately.
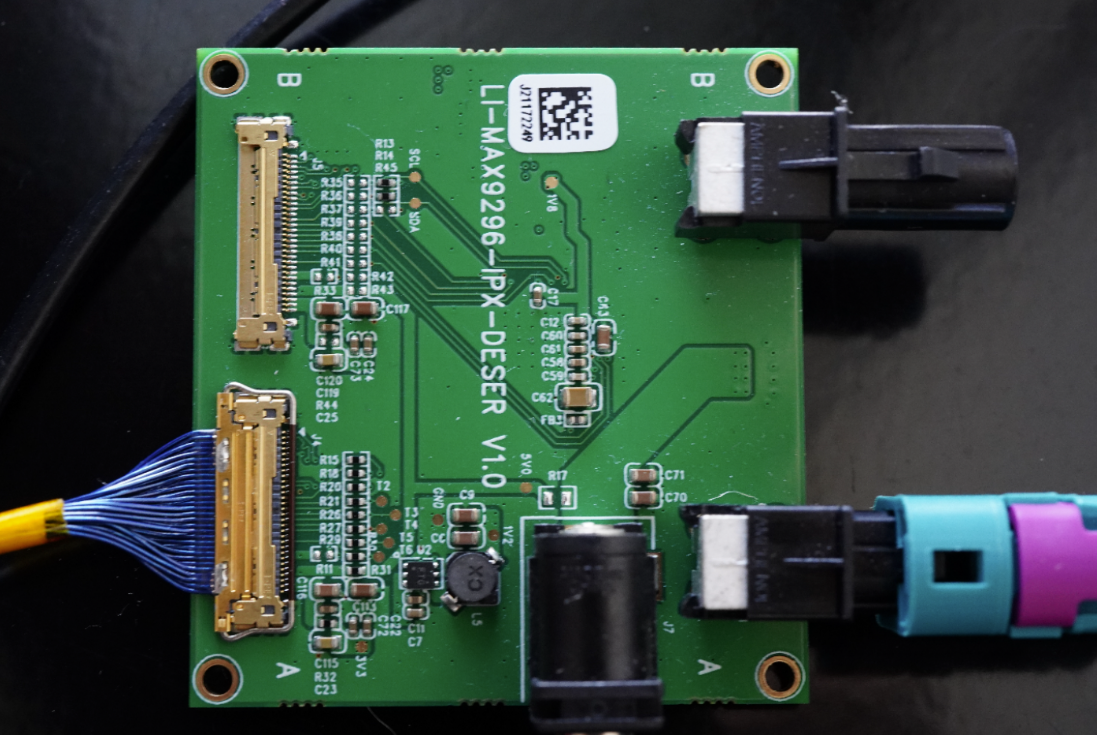
Fig. 3.6 Example of LI-MAX9296-IPX-DESER Cable Connection#
Connect the camera to the other FAKRA connector of the GMSL2 cable. Ensure that the side with the silver label is facing upwards.
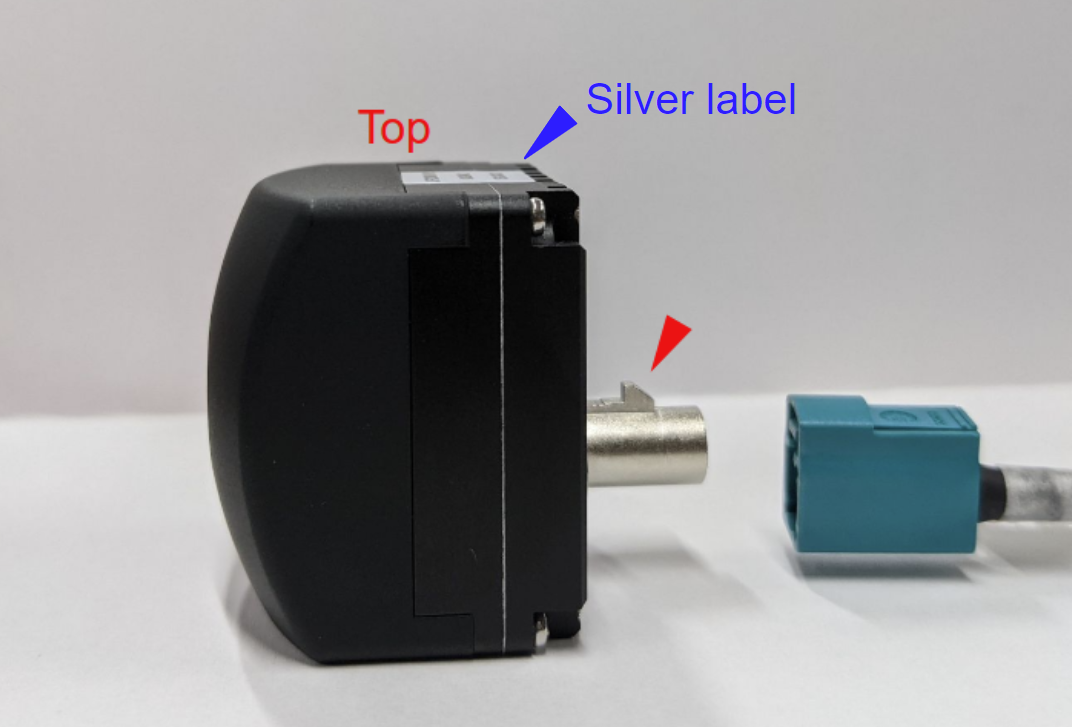
Fig. 3.7 Camera Orientation and Cable Insertion Direction (Silver Label Side Up)#
3.2.2. Other Hardware Connections#
If necessary, connect a mouse, keyboard, HDMI cable, etc., to the Devkit.
3.3. Software Setup#
3.3.1. Software Requirements#
Please verify if your Devkit meets the software requirements for the following drivers:
Software |
Version |
Download Link |
|---|---|---|
JetPack |
5.1.1 |
|
tier4-gmsl-camera |
1.2.1 or higher |
Caution
For C2, you need to update the camera driver to 1.4.1 (or higher)
If your target Devkit does not meet the software requirements, please proceed with the installation of JetPack. There are two methods available for JetPack installation:
Manual Installation: Download the JetPack data from the provided link and perform the installation manually. In this case, you should install L4T 35.2.1.
Nvidia SDK Manager: Use the Nvidia SDK Manager for installation.
We recommend using the SDK Manager (method 2) for installation to ensure a smoother installation process and avoid potential installation problems.
Note
Nvidia SDK Manager cannot be used to install JetPack if you have Ubuntu 22.04.
3.3.2. Driver Package Installation#
This step should be performed on the Devkit.
Copy the driver package file (obtain the latest version from the provided link) to any directory of your choice. After the copy is complete, enter the following command: ※Replace x.x.x with the driver version. Specify the version of the downloaded driver.
cd <Directory of your choice>
sudo apt install ./tier4-camera-gmsl_x.x.x_arm64.deb
After installing the driver, you need to generate a custom dtb file to define the assignment of cameras for each GMSL port. Please refer camera driver installation for the details. You also can refer to the getting started guide for ADLINK ROSCube for some examples of overlay the commands.
# This is the case that all GMSL ports are assigned as C1
sudo /opt/nvidia/jetson-io/config-by-hardware.py -n 2="TIERIV ISX021 GMSL2 Camera Device Tree Overlay"
sudo shutdown -h now # Power off
After completing the process, please restart the Devkit.
After installing the drivers, you may encounter error messages related to i2c write errors or similar issues in the kernel messages (syslog or dmesg command output). These errors are typically related to ports where cameras are not connected, and you can proceed with camera image acquisition without any problems.
Example error message:
Jun 29 17:13:53 jetson-desktop kernel: [   11.114217] tier4_max9295 30-0062: [tier4_max9295_write_reg] : Max9295 I2C write failed.    Reg Address = 0x0000  Data= 0xC0.
Jun 29 17:13:53 jetson-desktop kernel: [   11.115551] tier4_max9295 30-0060: [tier4_max9295_write_reg] : Max9295 I2C write failed.    Reg Address = 0x0010  Data= 0x22.
Jun 29 17:13:53 jetson-desktop kernel: [   11.116391] tier4_max9295 30-0060: [tier4_max9295_setup_control]: Ser device not found
Jun 29 17:13:53 jetson-desktop kernel: [   11.116617] tier4_isx021 30-001c: [tier4_isx021_gmsl_serdes_setup] : Failed to setup GMSL serializer.
Jun 29 17:13:53 jetson-desktop kernel: [   11.116873] tier4_isx021 30-001c: [tier4_isx021_probe] : Failed GMSL Serdes setup.
Jun 29 17:13:53 jetson-desktop kernel: [   11.117134] tier4_isx021: probe of 30-001c failed with error -121
Jun 29 17:13:53 jetson-desktop kernel: [   11.117340] tier4_isx021 30-001b: [tier4_isx021_probe] : Probing V4L2 Sensor.
Jun 29 17:13:53 jetson-desktop kernel: [   11.117666] debugfs: Directory 'isx021_a' with parent '/' already present!
Jun 29 17:13:53 jetson-desktop kernel: [   11.117871] tier4_isx021 30-001b: tegracam sensor driver:isx021_v2.0.6
Jun 29 17:13:53 jetson-desktop kernel: [   11.226016] tier4_max9295 30-0062: [tier4_max9295_write_reg] : Max9295 I2C write failed.    Reg Address = 0x0000  Data= 0x84.
Jun 29 17:13:53 jetson-desktop kernel: [   11.227182] tier4_max9295 30-0042: [tier4_max9295_write_reg] : Max9295 I2C write failed.    Reg Address = 0x0010  Data= 0x21.
Jun 29 17:13:53 jetson-desktop kernel: [   11.228005] tier4_max9295 30-0042: [tier4_max9295_setup_control]: Ser device not found
Jun 29 17:13:53 jetson-desktop kernel: [   11.228218] tier4_isx021 30-001b: [tier4_isx021_gmsl_serdes_setup] : Failed to setup GMSL serializer.
Jun 29 17:13:53 jetson-desktop kernel: [   11.228465] tier4_isx021 30-001b: [tier4_isx021_probe] : Failed GMSL Serdes setup.
Jun 29 17:13:53 jetson-desktop kernel: [   11.228717] tier4_isx021: probe of 30-001b failed with error -121
When using NVMe storage (M.2 SSD)
Please be aware that if you have installed the operating system on the NVMe storage, the system may be reading the configuration from the onboard storage. If the camera devices are not visible even after restarting, in addition to the setup instructions provided earlier, you may need to mount the onboard storage and copy the following files to the /boot directory on the onboard storage:
- /boot/extlinux/extlinux.conf
- /boot/kernel_tegra234-p3701-0000-p3737-0000-user-custom.dtb
3.4. Camera Image Acquisition#
3.4.1. Confirm the Camera Devices#
Open a terminal and run the following command to verify if the cameras are recognized as v4l2 devices. If the number of video devices matches the number of connected cameras, the camera recognition check is complete.
ls /dev/video*
/dev/video0
/dev/video1
.
.
3.4.2. Camera Image Data Acquisition#
Open a terminal and execute the following command to start image acquisition using Gstreamer. A new window will open, displaying the camera image.
3.4.2.1. Example 1: Evaluation with a C1 camera#
gst-launch-1.0 v4l2src io-mode=0 device=/dev/video0 do-timestamp=true ! 'video/x-raw, width=1920, height=1280, framerate=30/1, format=UYVY' ! videoscale ! xvimagesink sync=false
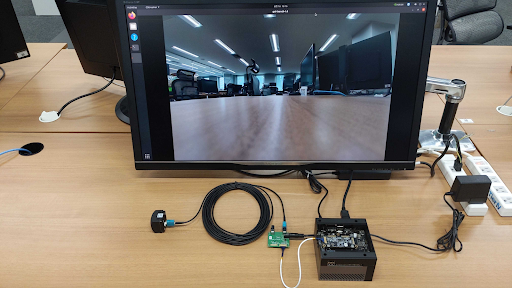
Fig. 3.8 Example of Camera Image Data Acquisition#
3.4.2.2. Example 2: Evaluation with four C1 cameras#
gst-launch-1.0 v4l2src io-mode=0 device=/dev/video0 do-timestamp=true ! \
'video/x-raw, width=1920, height=1280, framerate=30/1, format=UYVY' ! \
xvimagesink sync=false v4l2src io-mode=0 device=/dev/video1 do-timestamp=true ! \
'video/x-raw, width=1920, height=1280, framerate=30/1, format=UYVY' ! xvimagesink sync=false \
v4l2src io-mode=0 device=/dev/video2 do-timestamp=true ! \
'video/x-raw, width=1920, height=1280, framerate=30/1, format=UYVY' ! xvimagesink sync=false \
v4l2src io-mode=0 device=/dev/video3 do-timestamp=true ! \
'video/x-raw, width=1920, height=1280, framerate=30/1, format=UYVY' ! xvimagesink sync=false
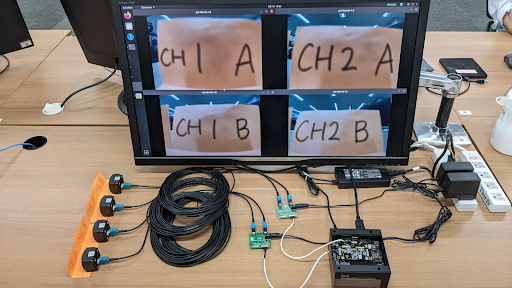
Fig. 3.9 Example of Camera Image Data Acquisition (Four Cameras)#
3.4.2.3. Example 3: Evaluation with a C2 camera#
gst-launch-1.0 v4l2src io-mode=0 device=/dev/video0 do-timestamp=true ! 'video/x-raw, width=2880, height=1860, framerate=30/1, format=UYVY' ! videoscale ! xvimagesink sync=false
Note
You can also utilize the gstreamer launch script.
Note
If you encounter the error message ‘no element “v4l2src”’, please delete the directory ~/.cache/gstreamer-1.0 and try the command again.
Constraint on camera boot order (For driver version earlier than v1.1.1)
If you are using a driver version earlier than v1.1.1, please follow the specific instructions for booting. For driver versions v1.2.1 and later, there are no ordering or constraint requirements
When using multiple cameras, all the cameras need to be started simultaneously.
For example, if you are using two cameras, you need to start image acquisition with the following one-liner command:
```
# This one-liner command works
tier4@jetson:~$ gst-launch-1.0 v4l2src io-mode=0 device=/dev/video0 do-timestamp=true ! \
'video/x-raw, width=1920, height=1280, framerate=30/1, format=UYVY' ! \
xvimagesink sync=false v4l2src io-mode=0 device=/dev/video1 do-timestamp=true ! \
'video/x-raw, width=1920, height=1280, framerate=30/1, format=UYVY' ! xvimagesink sync=false \
```
These separated commands may not work:
```
# These separated commands may not work

# On a terminal
tier4@jetson:~$ gst-launch-1.0 v4l2src io-mode=0 device=/dev/video0 do-timestamp=true ! \
'video/x-raw, width=1920, height=1280, framerate=30/1, format=UYVY' ! \
xvimagesink sync=false

# On another terminal
tier4@jetson:~$ gst-launch-1.0 v4l2src io-mode=0 device=/dev/video1 do-timestamp=true ! \
'video/x-raw, width=1920, height=1280, framerate=30/1, format=UYVY' ! \
xvimagesink sync=false

```
3.5. Recording Image Data#
You can use Gstreamer to record the image data while encoding it in H.265. Please modify the bitrate, file name, and other parameters according to your needs.
Example 1: Recording with a C1 camera
gst-launch-1.0 -e v4l2src io-mode=0 device=/dev/video0 do-timestamp=true ! 'video/x-raw, width=1920, height=1280, framerate=30/1, format=UYVY' ! nvvidconv ! nvv4l2h265enc bitrate=3000000 ! h265parse ! qtmux ! filesink location=out.mp4
Example 2: Recording with two C2 cameras
gst-launch-1.0 -e v4l2src io-mode=0 device=/dev/video0 do-timestamp=true ! 'video/x-raw, width=1920, height=1280, framerate=30/1, format=UYVY' ! tee name=camera1 v4l2src io-mode=0 device=/dev/video1 do-timestamp=true ! 'video/x-raw, width=1920, height=1280, framerate=30/1, format=UYVY' ! tee name=camera2 camera1. ! nvvidconv ! nvv4l2h265enc bitrate=3000000 ! h265parse ! qtmux ! filesink location=out_1.mp4 camera2. ! nvvidconv ! nvv4l2h265enc bitrate=3000000 ! h265parse ! qtmux ! filesink location=out_2.mp4
In the case of the C2 camera, please change the width, height, and framerate settings appropriately. width=2880 and height=1860.
3.6. Using Camera Image Data with ROS2#
3.6.1. ROS2 Installation#
The latest distribution provided by Jetpack is Ubuntu 20.04. The ROS2 distribution compatible with Ubuntu 20.04 is Galactic. However, Galactic has reached its end of life (EOL), so please install Humble either by building from the source or using Docker. Please refer to the below links for the details of installation.
We recommend using Docker because building ROS2 Humble from source on Jetson Orin (Ubuntu 20.04) may fail due to OS incompatibility.
3.6.2. Node Installation (if not installed yet)#
We recommend using the v4l2_camera node. Please refer to the Github repository for installation instructions.
3.6.3. Start v4l2_camera Node and Visualize Image Data Topics#
Open a terminal and start the v4l2_camera node with the following command:
ros2 run v4l2_camera v4l2_camera_node --ros-args \
  -p video_device:=/dev/video0 \
  -p pixel_format:=UYVY \
  -p image_size:=[1920,1280]
Note
In the case of C2, please change the configuration of image_size to [2880,1860].
The image topic (in ROS format) /image_raw will be published. Use rqt_image_view to visualize it. Open a new terminal and execute the following command to launch rqt_image_view:
ros2 run rqt_image_view rqt_image_view
3.6.4. Recording rosbag#
While the v4l2_camera node is running, you can record rosbag (ROS format log files) using the following command:
ros2 bag record -a
3.7. Configuration#
To modify camera driver settings, edit the /etc/modprobe.d/tier4-*.conf file. The configuration file contains the following lines (the case of tier4-isx021.conf):
# /etc/modprobe.d/tier4-isx021.conf
options tier4_isx021 trigger_mode=0 enable_auto_exposure=1 enable_distortion_correction=1
After editing these flags, restart the system for the changes to take effect.
3.7.1. Switching Drive Modes (Freerun/Trigger)#
Warning
Please note that drive mode switching is not supported on Jetson Orin/Xavier Development Kit. as there is no FSYNC input function on Jetson Orin/Xavier devkit. Changing from the default settings may cause unintended behavior, so please refrain from doing so.
3.7.1.1. The case of C1#
Drive mode is fixed to 30fps freerun mode. Other drive mode is not supported.
3.7.1.2. The case of C2#
Drive mode |
Frame rate |
trigger_mode= |
Master |
10fps |
0 |
Master |
20fps |
2 |
Master |
30fps |
4 |
3.7.2. Enabling/Disabling Lens Distortion Correction (LDC) Feature#
You can enable or disable the Lens Distortion Correction (LDC) feature by modifying the value of the enable_distortion_correction flag.
To enable Lens Distortion Correction, set enable_distortion_correction=1. To disable Lens Distortion Correction, set enable_distortion_correction=0.
3.7.3. Setting exposure time#
3.7.3.1. The case of C1#
In the case of C1, users can specify three types of exposure time via variables named shutter_time_min, shutter_time_mid, and shutter_time_max.
The actual exposure time of C1 transits these three (and linearly interpolated values) corresponding to the illuminance.
The values for the variables should be specified in microseconds. Users who would like to fix exposure time under arbitral illuminance conditions can set the exact same value for these variables.
For example, the following configuration in /etc/modprobe.d/tier4-isx021.conf fixes exposure time to 11 ms:
shutter_time_min=11000 shutter_time_mid=11000 shutter_time_max=11000
3.7.3.2. The case of C2#
Likewise C1, C2 also has capability to set two types of exposure time via variables named shutter_time_min and shutter_time_max.
The unit of the value for these variables is also microseconds.
For example, the following configuration in /etc/modprobe.d/tier4-imx490.conf fixes exposure time to 11 ms:
shutter_time_min=11000 shutter_time_max=11000
3.7.4. For other parameter adjustments#
Please refer to the T4cam-ctrl user manual