2. Camera Control Tool User Manual (t4cam-ctrl)#
This tool provides image parameter tuning functions for TIER IV AUTOMOTIVE HDR CAMERA C1.
This tool(ver. 1.4.0) is still a preview version. If you find anything wrong, please contact Camera Support, or make an Issue on the Camera Driver Repository.
2.1. Requirements#
The camera driver is properly installed and the system can get an image stream from the camera.
The I2C bus is available to send commands. (The GMSL2-USB3 conversion kit doesn’t support this tool.)
The ECU/BSP shown below are confirmed to work properly. If you want to use other configurations, please contact at the camera support.
NVIDIA Jetson Xavier Development Kit / R32.5.1
NVIDIA Jetson Orin Development Kit / R35.1
ADLINK RQX-58G ROSCUBE-X / R32.5.1, R32.6.1

Fig. 2.4 ADLINK ROSCUBE-X(RQX-58G) connection example#
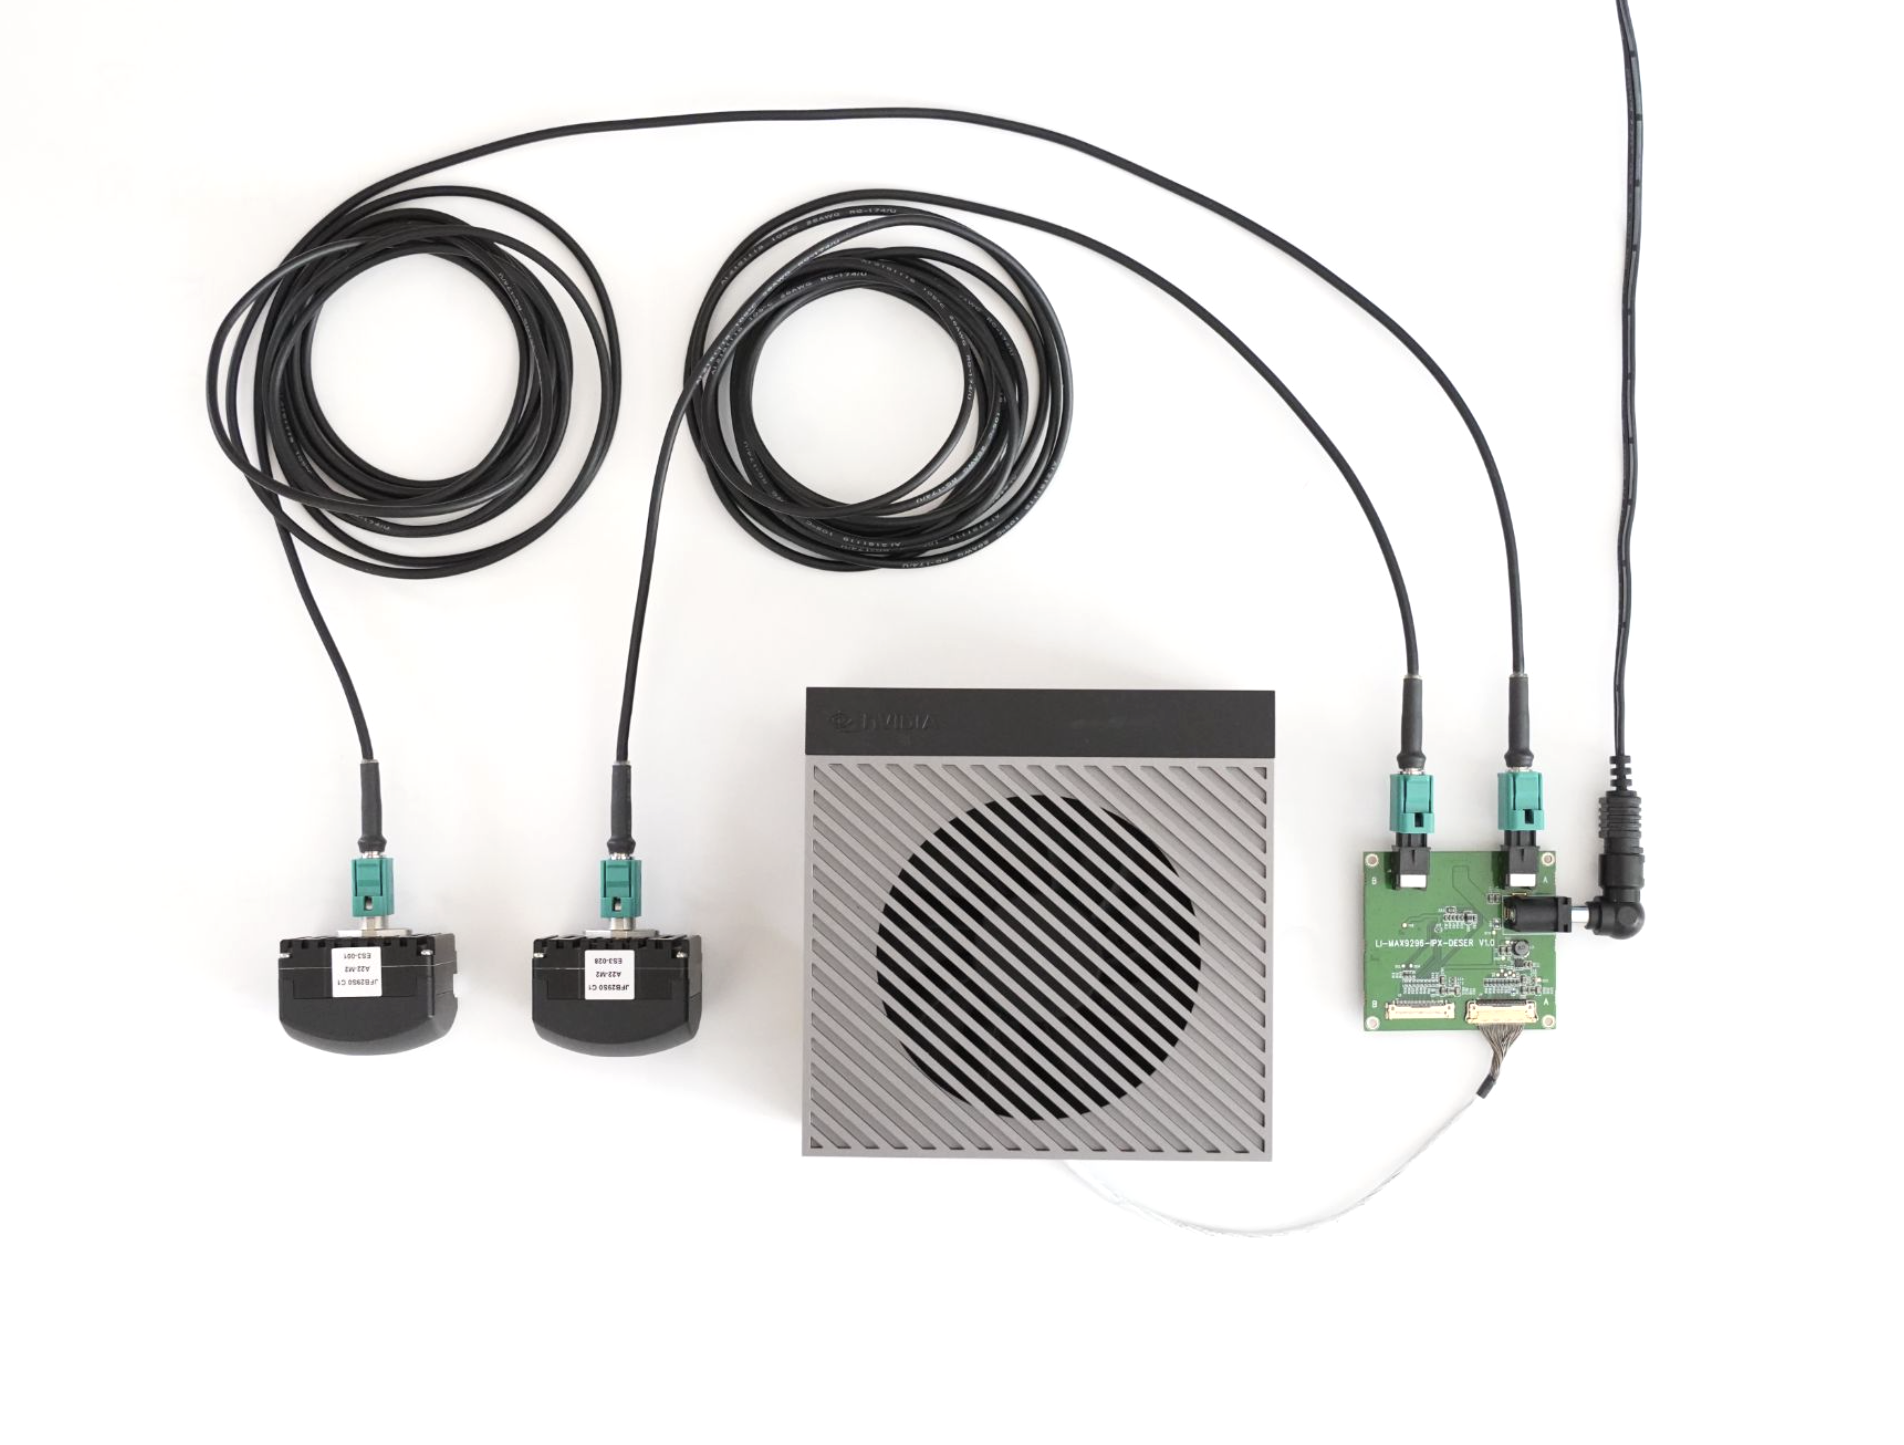
Fig. 2.5 NVIDIA Jetson Orin Development Kit connection example#
2.2. Installation#
Please follow the instructions below to download/install the tool.
Visit release page
Download
t4cam_sdk-*-Linux.deb
Visit release page
Download
t4cam_sdk-*-rqx.deb
2.3. CUI Tool#
Image tuning with CUI commands.
Camera parameters can be configured by specifying the options/values in commands.
The current camera parameters can be saved as a setting file(yaml format) and it can be loaded to reproduce the settings.
The setting file is configurable using a text editor.
To activate, please type
t4cam-ctrl
help option gives you descriptions of each option.
t4cam-ctrl --help
usage: ./t4cam-ctrl [options] ...
options:
  -p, --port-num               set port number [0-7] (int [=0])
  -i, --input                  Sets the name of the file to read parameter values (string [=./default.yaml])
  -o, --output                 Sets the name of the file to save the current parameter values. (string [=])
  -m, --model                  set model (string [=c1])
  -t, --tempature              get Tempature val
  -B, --brightness             set Brightness val (float [=0])
  -C, --contrast               set Contrast val (float [=0])
  -H, --hue                    set Hue val (int [=0])
  -S, --saturation             set Saturation val (float [=0])
  -s, --sharpness              set sharpness val (string [=])
      --atr_contrast_gain      set atr contrast gain (int [=0])
      --atr_brightness_gain    set atr brightness gain (int [=0])
      --sensormode             set sensor_mode val (int [=0])
      --isp_sensor_gain        set isp_sensor_gain val (float [=0])
      --sensor_gain            set sensor_gain val (float [=0])
  -a, --awb                    set awb enable (bool [=0])
      --awb_gain_g             set awb gain g (float [=0])
      --awb_gain_r             set awb gain r (float [=0])
      --awb_gain_b             set awb gain b (float [=0])
  -A, --auto_exposure          set auto exposure (bool [=0])
      --shutter_on_ae          set shutter time on Ae (int [=0])
  -v, --vv                     get debug_message
  -e, --evrefoffset            set EvrefOffset val (float [=0])
  -D, --digitalgain            set DigitalGain val (float [=0])
  -?, --help                   print this message
Details of each option are described below:
2.3.1. Usage Example for C1 camera#
2.3.1.1. Change contrast of the camera #0#
Set the contrast x1.5 of the current value.
t4cam-ctrl -p 0 -C 1.5
2.3.1.2. Read the temperature of camera #1#
Read the temperature of the camera #1
t4cam-ctrl -p 1 -t
2.3.1.3. Load the settings file#
Load the settings file camera_param_0.yaml to the camera #0
t4cam-ctrl -p 0 -i camera_param_0.yaml
Load the settings file camera_param_3.yaml to the camera #3
t4cam-ctrl -p 3 -i camera_param_3.yaml
2.3.1.4. Save camera parameters as a setting file#
Save the current camera parameters of camera #0 as sample.yaml
t4cam-ctrl -p 0 -o ./sample.yaml
2.3.2. Usage Example for C2 camera#
Note
For C2, you need to specify -m c2 or –model c2
2.3.2.1. Change brightness of the camera #2#
Change the brightness of the camera #2
t4cam-ctrl -p 2 -m c2 -B 100
2.4. GUI Tool#
Image tuning with a graphical user interface.
Users can change parameters using the slide bars and the buttons. Parameters are immediately applied to the corresponding cameras.
Adjusted parameters can be saved as a setting file(yaml file) and it can be loaded to reproduce the settings.
The setting file is configurable using a text editor.
The GUI tool does change the settings of all the cameras at the same time and does NOT support adjusting each camera’s settings individually.
Please use the CUI tool described above to adjust each camera setting separately.
To activate, please type below
t4cam-ctrl-gui
t4cam-ctrl-gui -2

# or
t4cam-ctrl-gui --c2
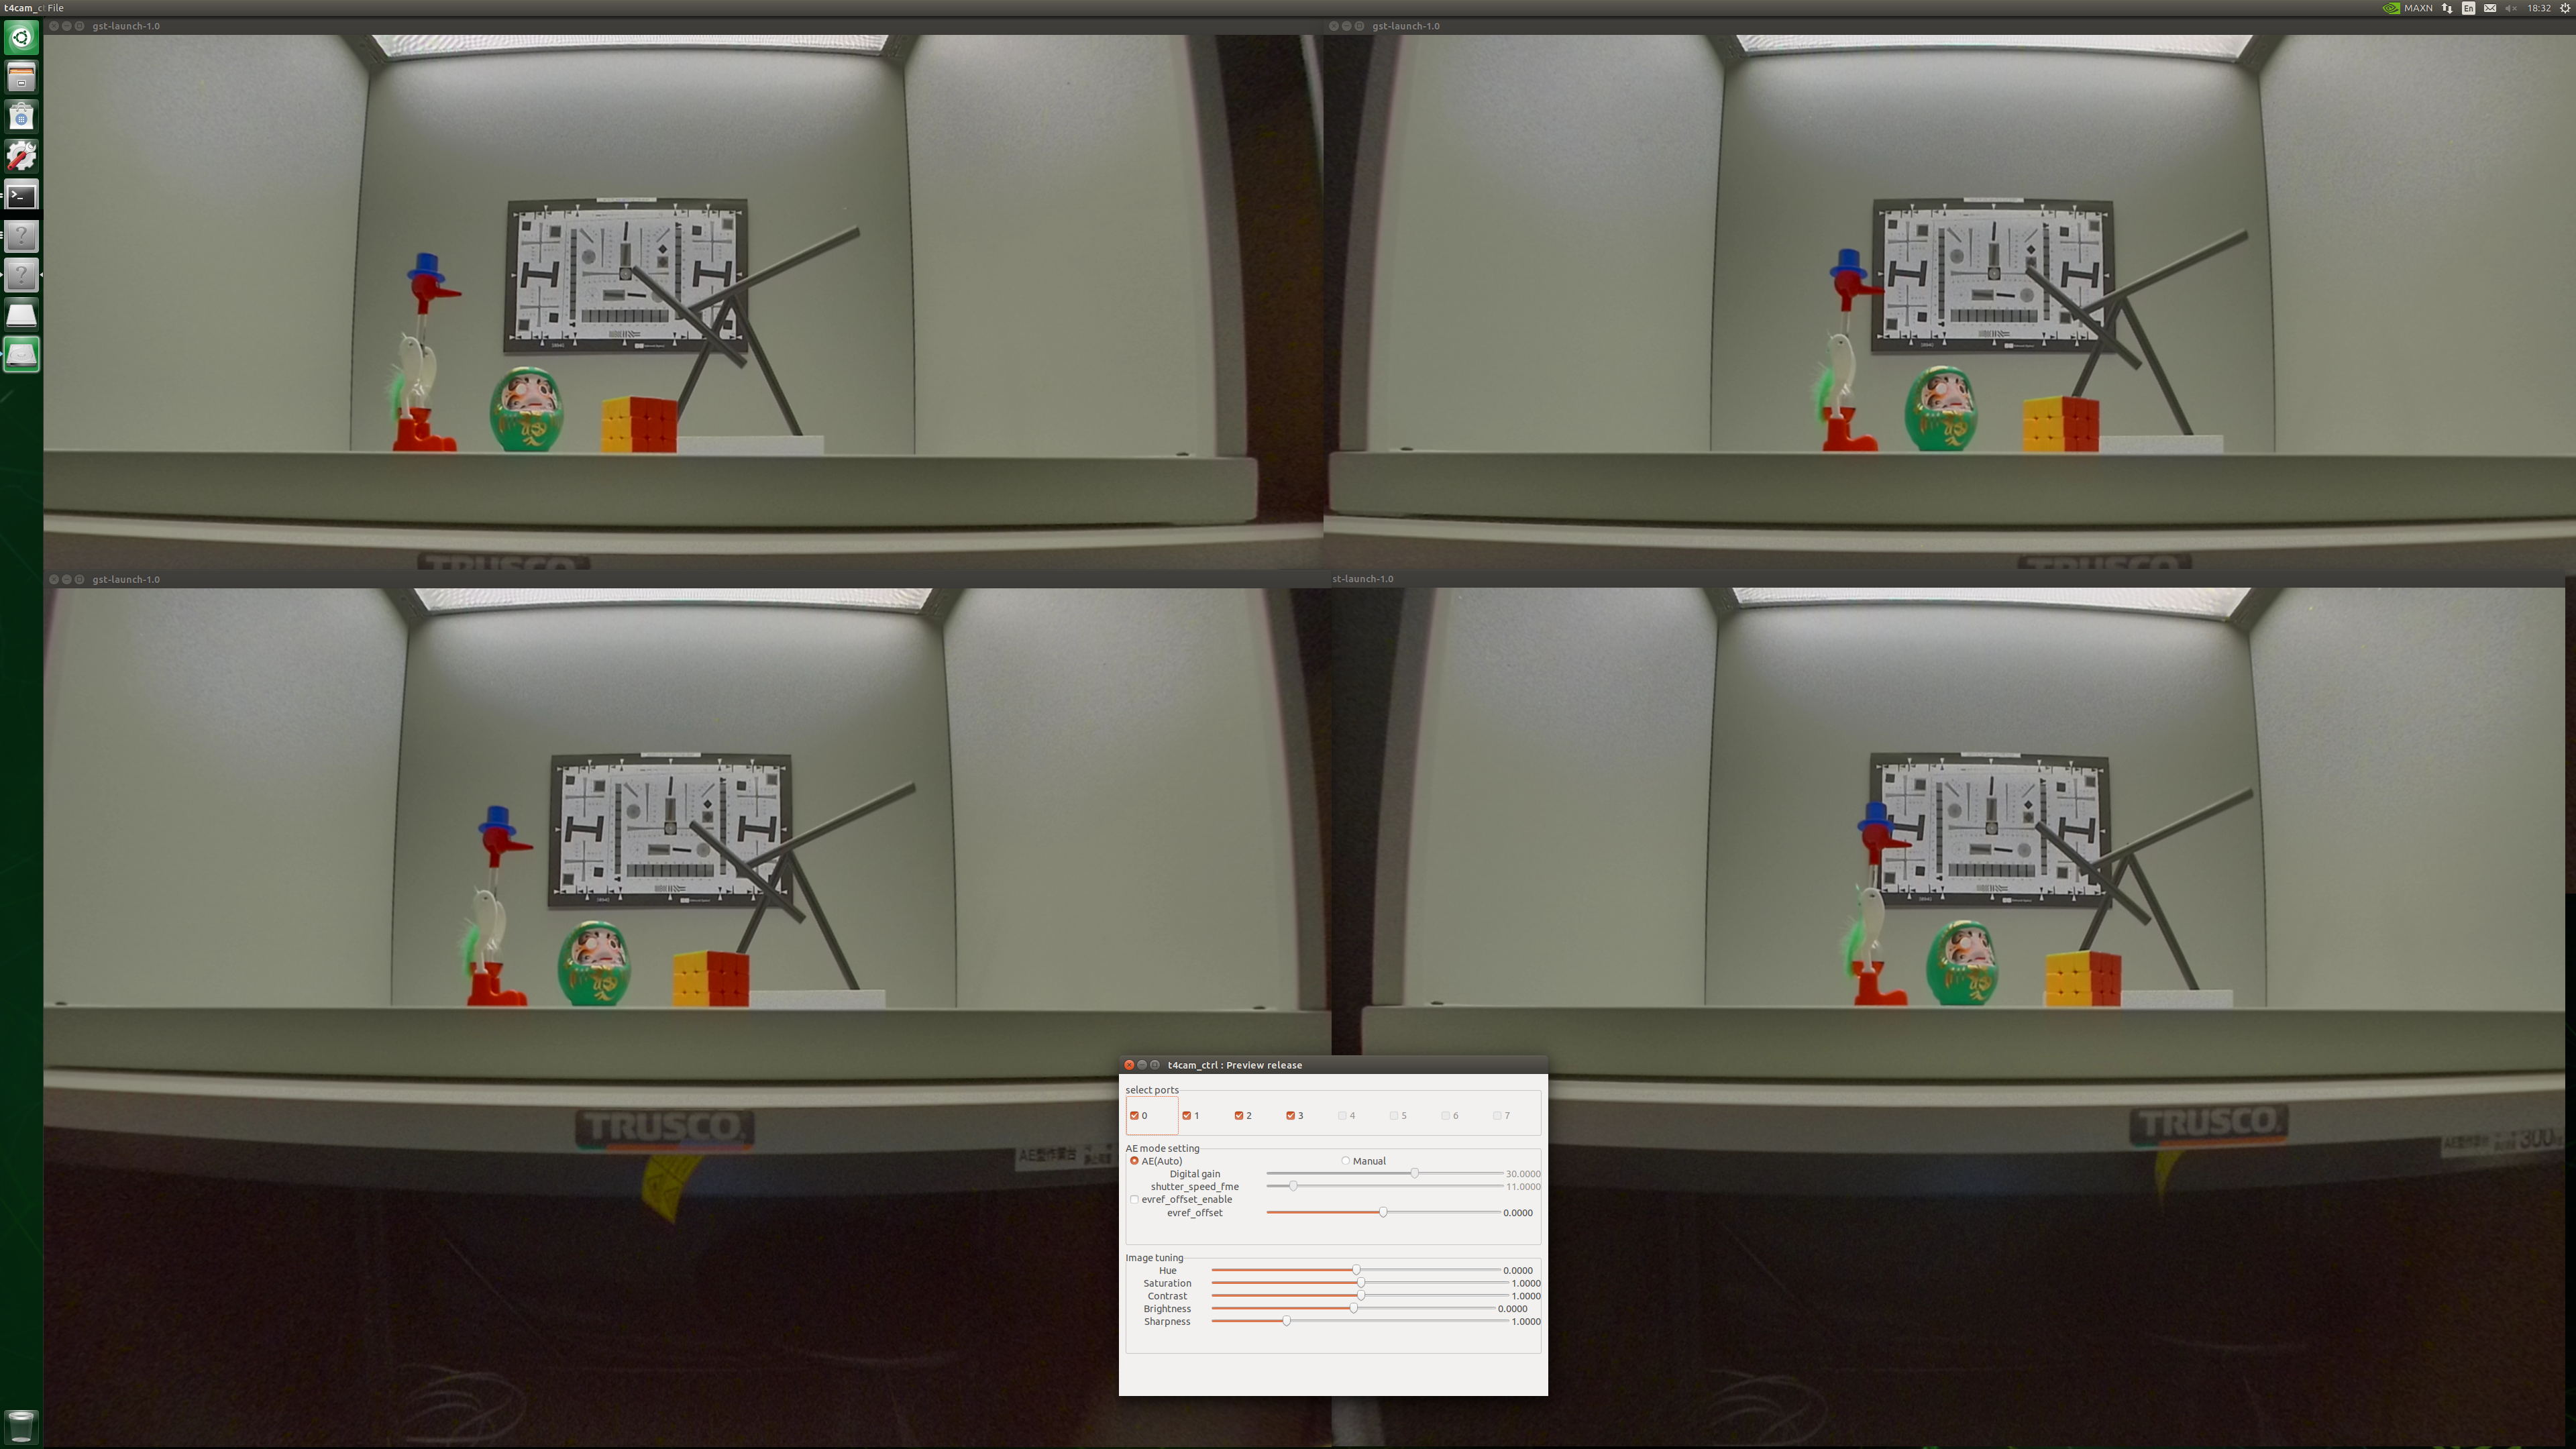
Fig. 2.6 Before image parameter change#
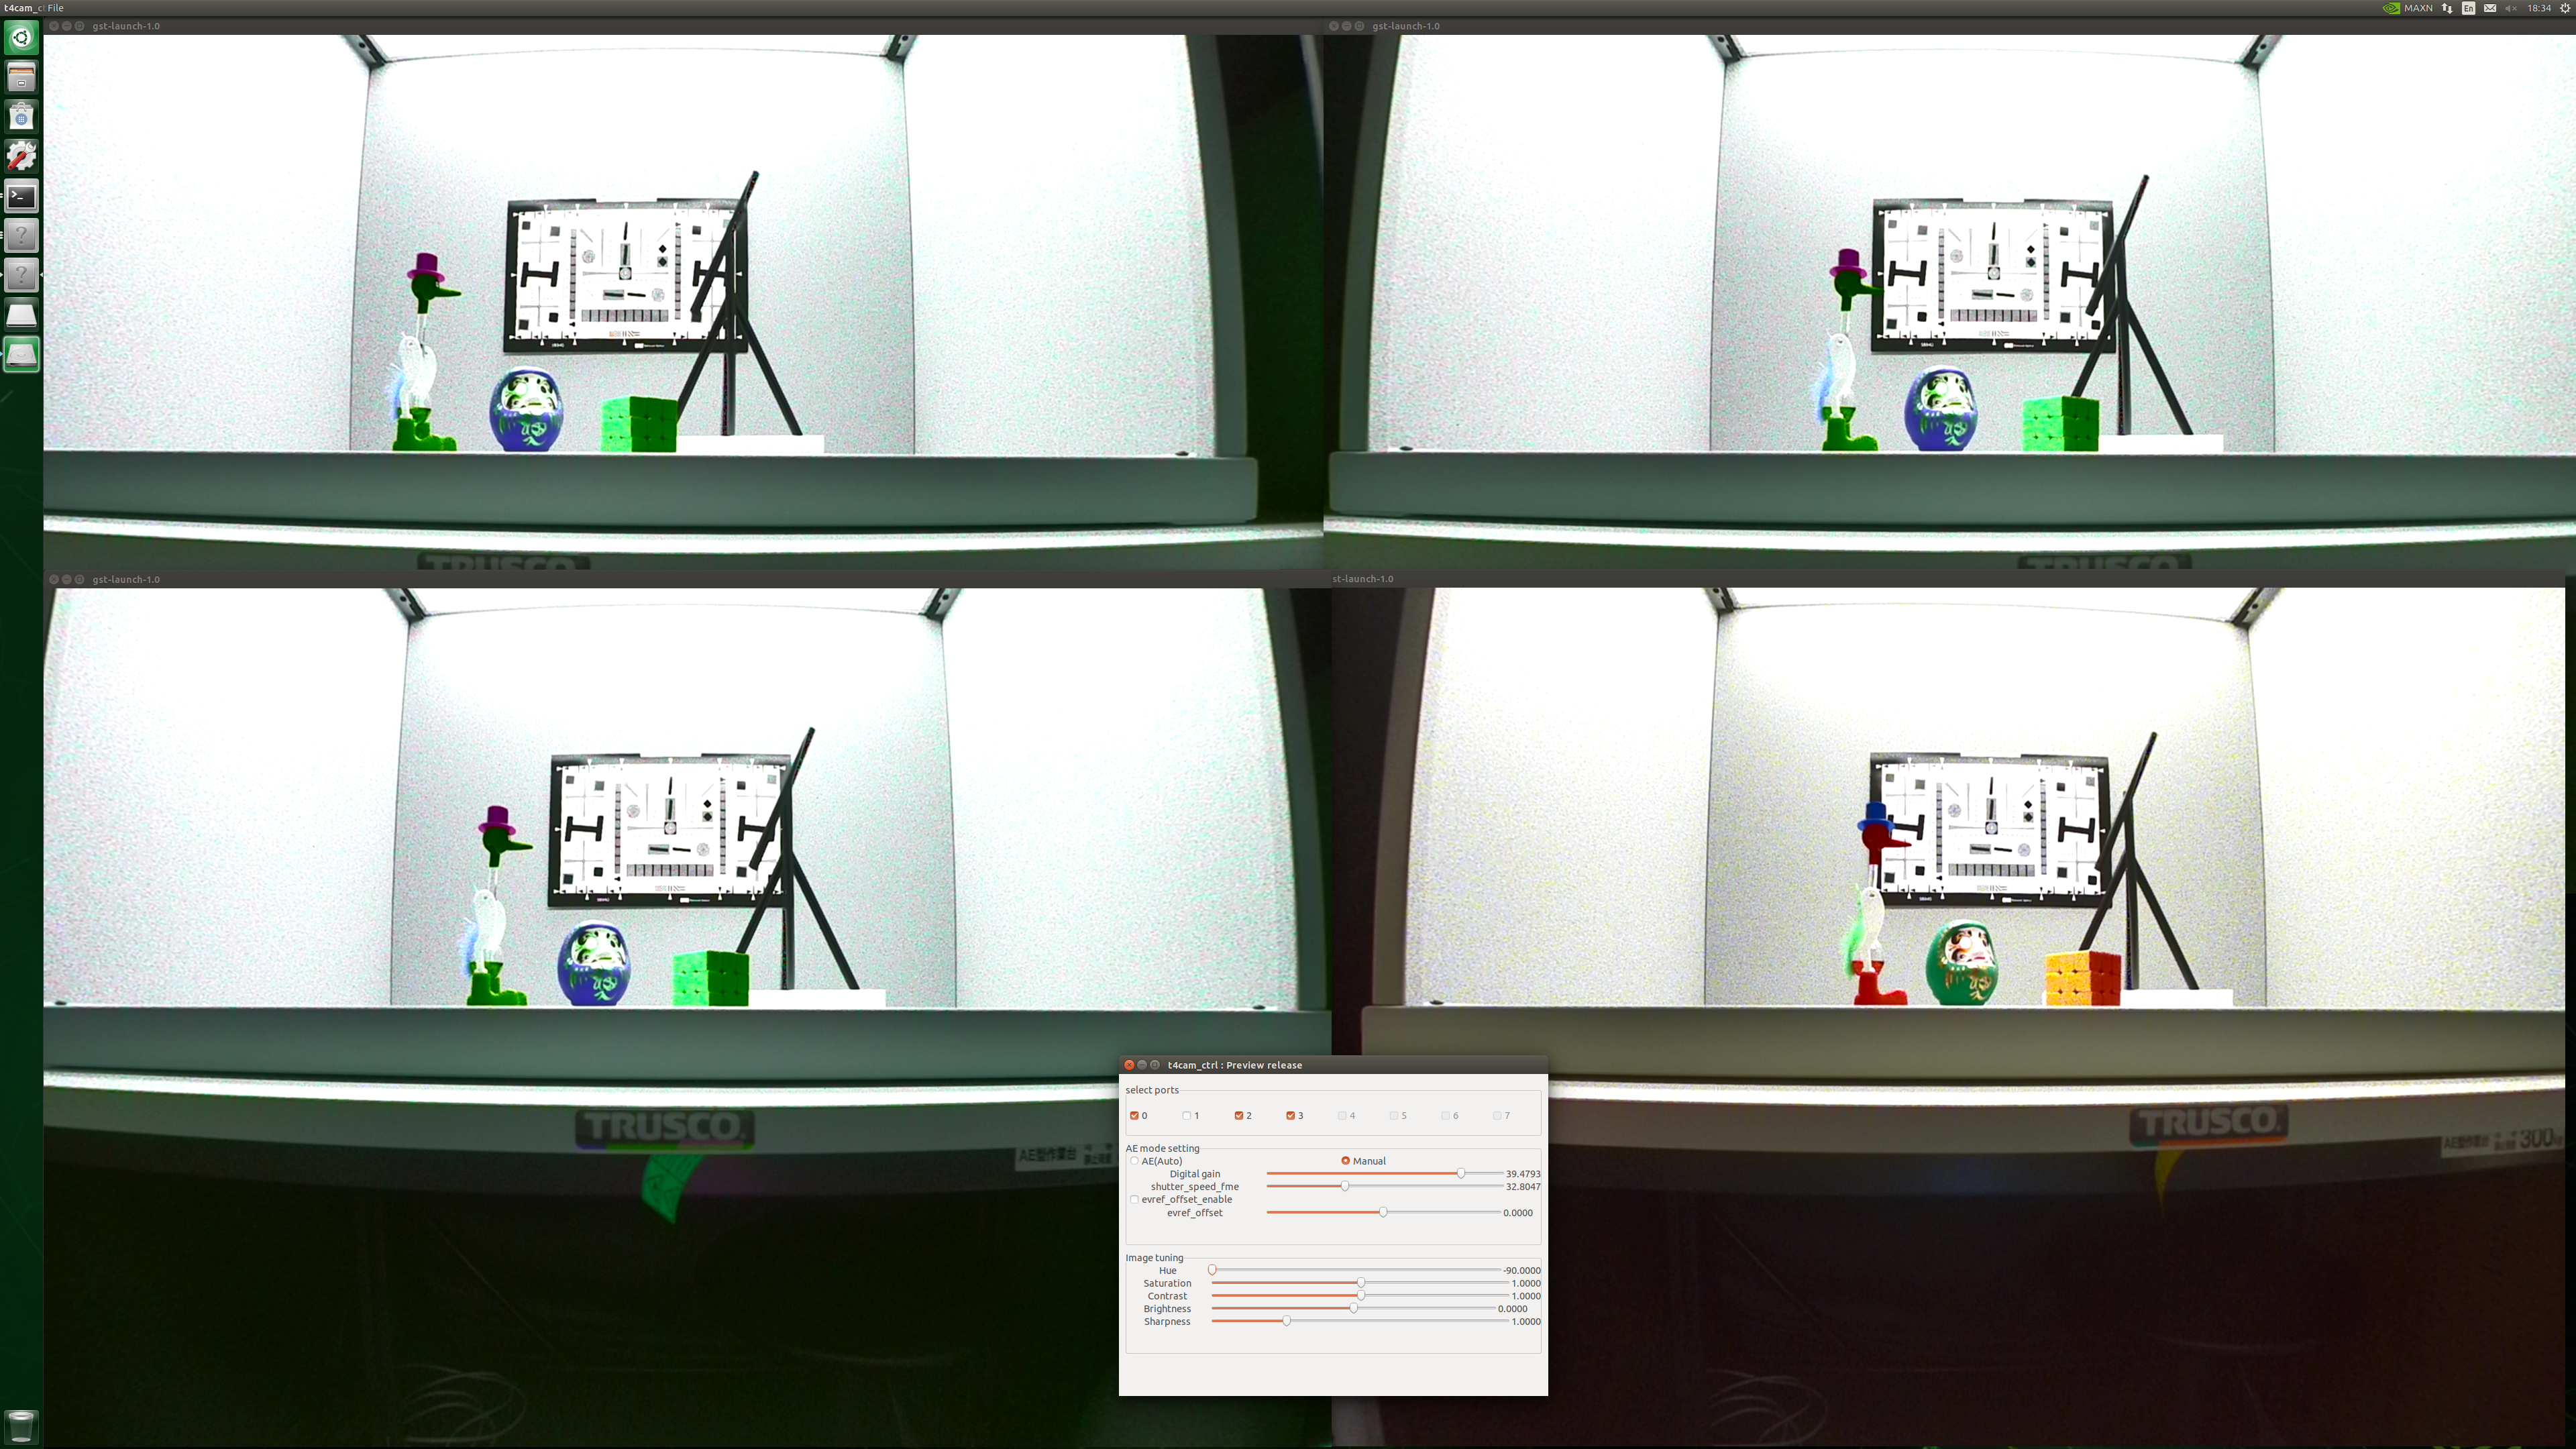
Fig. 2.7 After image parameter chage(Changed parameters just to show how it works.)#
2.4.1. Menu#
Please choose functions from the menu bar.
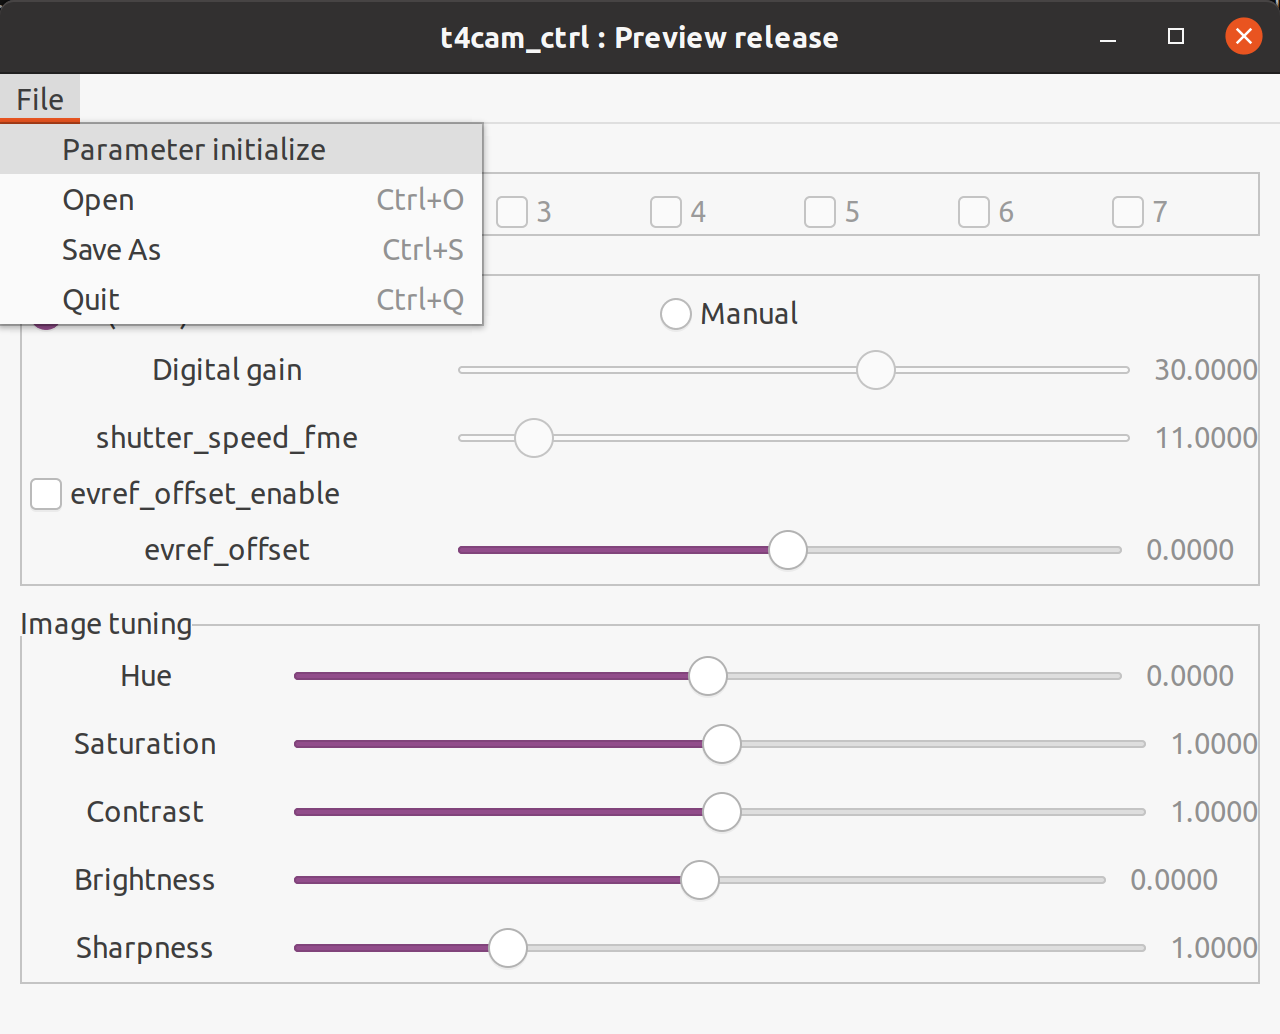
Fig. 2.8 GUI Menu (in the case of C1)#
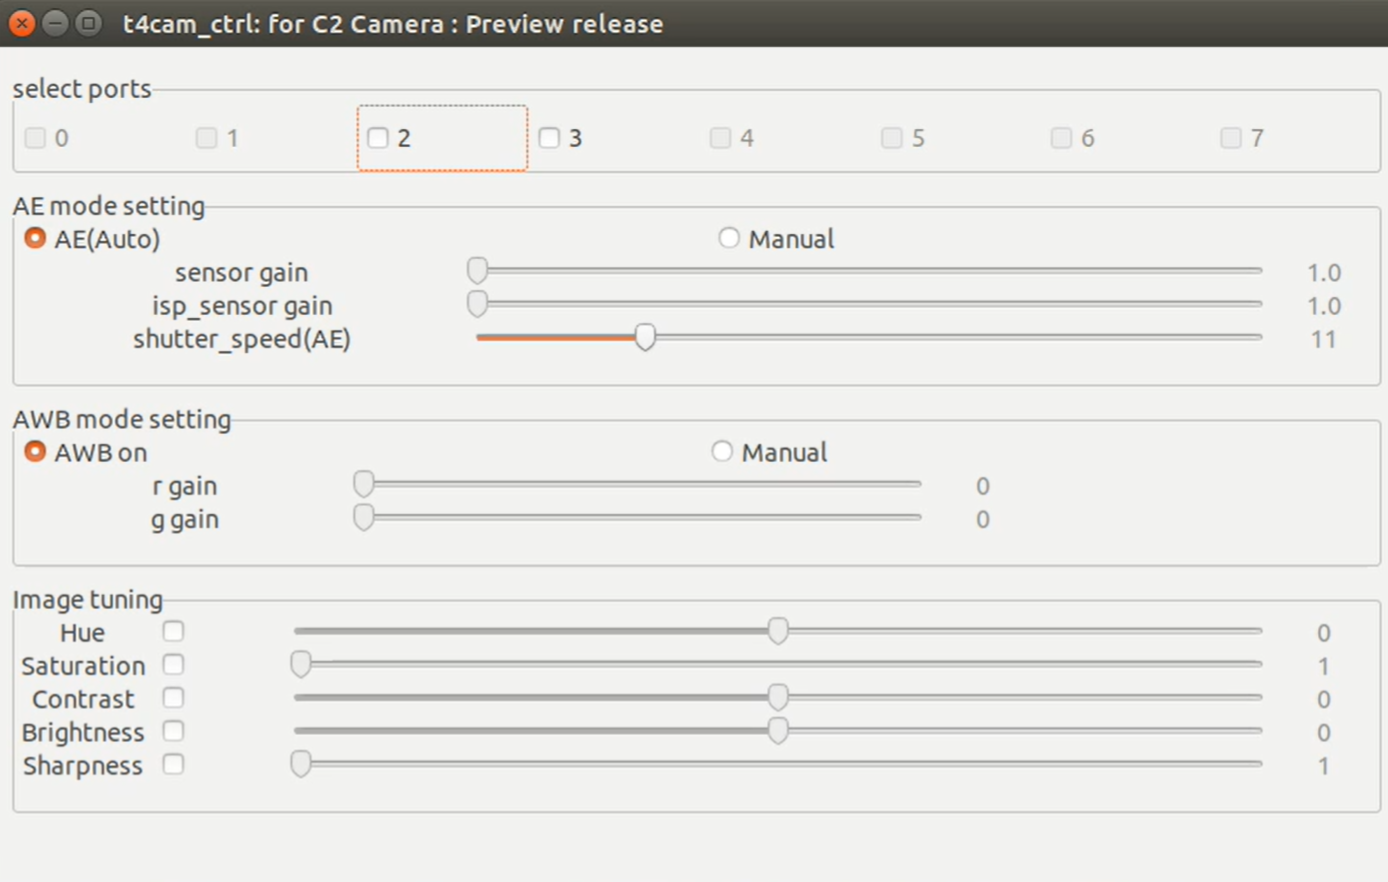
Fig. 2.9 GUI Menu (in the case of C2)#
2.4.2. Parameter initialize#
Load the default parameters to the camera. Please be careful since this action does NOT save the current settings.
2.4.3. Open#
Load a setting file and apply the values to the camera.
2.4.4. Save As#
Save the current camera settings. In the case that multiple cameras are selected, the one with the smallest number will be saved.
Warning
Currently, functions listed below are not supported for C2
2.4.5. Select ports (common)#
Please check the corresponding port numbers(camera numbers) that you want to adjust parameters. If the camera that you want to select doesn’t appear, please check the connection. You can select multiple cameras at once and the same parameters will be applied to all the cameras selected.
2.4.6. Exposure adjustments for C1#
Use the slider and/or the button to adjust the parameters.
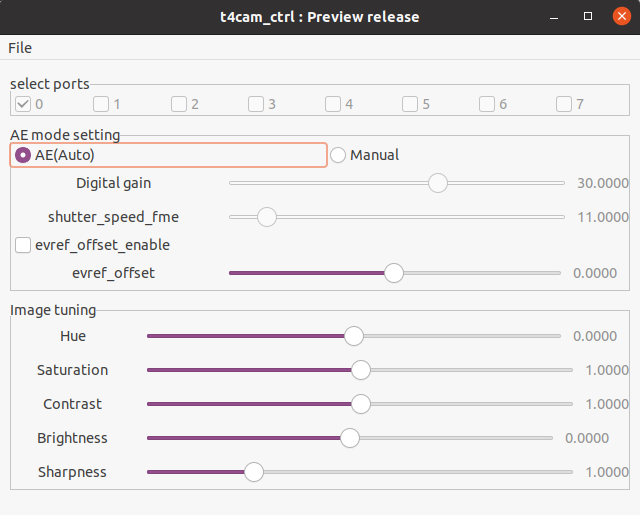
2.4.6.1. Exposure mode#
Change exposure mode from the two options below:
AE(Auto Exposure)
Manual
“Auto” mode provides auto exposure that adjusts exposure settings automatically.
If you want to change the minimum and/or maximum shutter speed, this GUI tool does NOT support it. Please refer to the /etc/modprobe.d/tier4-isx021.conf to change it.
“Manual” mode allows users to change digital gain and shutter speed using this GUI tool.
2.4.6.2. Digital gain#
It is configurable when the exposure mode is “Manual”.
You can change the value in the range from 0 to 48 in the unit of dB. The default value is 30dB.
2.4.6.3. Shutter speed (shutter_speed_fme)#
It is configurable when the exposure mode is “Manual”. You can change the value in the range from 1 to 260 in the unit of ms(milliseconds).
2.4.6.4. Exposure control(evref_offset_enable/evref_offset)#
The value is applied when the checkbox “evref_offset_enable” is enabled. It gives an offset to the target AE value. You can change the value in the range from -12.8 to 12.7 in the unit of dB.
2.4.7. Adjustment parameters for C2#
2.4.7.1. AE mode settings#
Change exposure mode from the two options below:
AE(Auto Exposure) : Shutter speed can be adjusted by sliding the slide bar. Sensor gain/ISP gain will be adjusted automatically.
Manual : Sensor gain and ISP gain can be adjusted by the slide bar. The shutter speed will be adjusted automatically.
2.4.7.2. AWB mode setting#
AWB on : AWB (Auto white balance) function is enabled.
Manual : The user can adjust the white balance by sliding the “r gain” and “b gain” slide bars.
2.4.8. Image adjustment (common)#
2.4.8.1. Hue#
To adjust the hue clockwise, set the value in the range from -90 to 90. To hold the hue as is, set the value at 0.
To adjust the hue clockwise, set the value in the range from -180 to 180. To hold the hue as is, set the value at 0.
2.4.8.2. Color Saturation#
To adjust the color saturation level, set the value in the range from 0.0 to 1.99. To increase color saturation, set a greater value. To hold the saturation as is, set the value at 1.0.
To adjust the color saturation level, set the value in the range from 0 to 255 To increase color saturation, set a greater value.
2.4.8.3. Contrast#
Set the contrast in the range from 0.0 to 1.99. To hold the contrast, set the value at 1.0.
To adjust the contrast, set the value in the range from -255 to 255 To increase contrast, set a greater value.
2.4.8.4. Brightness#
To adjust the brightness level, set the value in the range from -255 to 255 To increase brightness, set a greater value. To hold the contrast, set the value at 0.
To adjust the brightness level, set the value in the range from -255 to 255 To increase brightness, set a greater value. To hold the contrast, set the value at 0.